ADENIUM PROBLEMS
Adeniums, if grown well, are remarkably free of problems (unlike a plants like, say, Hybrid Hibiscus). Many of the commonest problems can be prevented by proper culture in the first place.Adeniums, if grown well, are remarkably free of problems (unlike a plants like, say, Hybrid Hibiscus). Many of the commonest problems can be prevented by proper culture in the first place.
Nutritional problems occur due to a number of reasons besides the actual lack of a particular nutrient in the media or water. Understanding overall plant nutrition and the needs of Adeniums is key to solving and preventing nutritional problems in Adeniums.
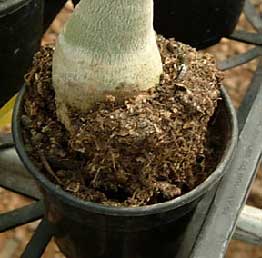
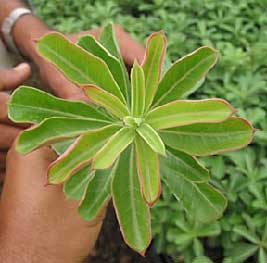 |
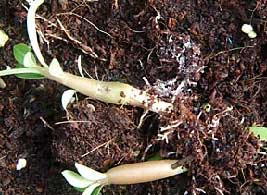
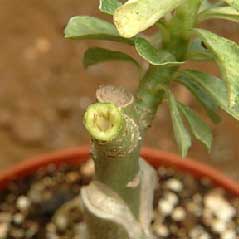
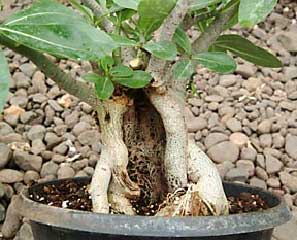
A generalized nutritional deficiency in a grafted Adenium: closer examination found that the plastic wrap around the graft was too tight and was girdling the stem. |
The commonest cause of Disease problems are due to over watering. This can be defined as watering in excess of the plants needs to the extent of causing harm. The amount and frequency of water applied to constitute over watering would thus be governed entirely by the plant's needs and its reaction to excess water. Thus in a media like Taiwan's stone chips and warm conditions, it would be virtually impossible to over water while in a media consisting of rotten, sticky peat and cool conditions, it would be very difficult not to do so.
Pest problems tend to be concentrated on soft new growth and early in the gowing season one needs to keep an eye out for pest build up.
Nutritional Problems:
As noted in the section on nutrition, Adeniums do well with a moderate amount of nutrition supplemented with complete micronutrients. Part of the reason is that the most successful media are soil less with either low nutrient holding capacity or even substantial nutrient binding ability ( e.g. for Copper) as well as being extremely well drained so that leaching is a major factor.
Check out the detailed article POT PLANT NUTRITION at www.hoscoindia.com for further information.
Common nutritional problems we have seen:
Macronutrients:
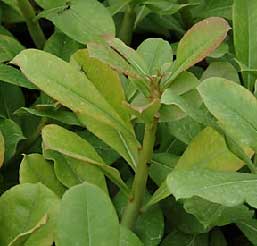 |
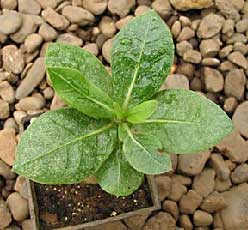
General macronutrient deficiency with yellow foliage, fallen lower leaves, red tinting and reduction in size of new leaves. These plants have been neglected and not fed for several months. |
Nitrogen (N): Deficiency leads to yellowing and subsequent dropping of lower leaves, small leaves and flowers and general lack of robustness. Typically a plant on low nitrogen levels will have naked stems with tufts of small, stiff leaves at the ends.
Excess will lead to soft, green rapid growth with big leaves and increased internode spaces.
Nitrogen levels can be used to control growth, along with phosphorous. Low levels contribute to hard growth so it's a judgment call and the grower must decide nitrogen levels to suit the needs.
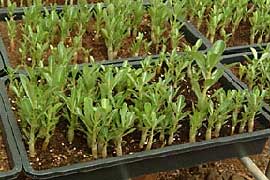 |
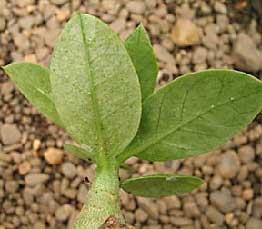
Ammonia nitrogen from 15:15:15 has caused the stretching in these seedlings. |
Nitrogen can be used in two forms- ammoniac and nitrate. We find that nitrate N gives more compact growth compared to ammonia and use it exclusively. The organic fertilizer sources provide a little Ammonia Nitrogen.
Potassium (K): We use Potassium nitrate and our media and water is pretty high in K so we have never had a problem with K deficiency. Theoretically a deficiency will lead to edge burn of lower leaves followed by leaf drop.
Excess K competes with Ca and Mg in an antagonistic relationship- we have high Mg in our water but we do need to supplement with Calcium to prevent problems.
Phosphorus (P): Deficiency leads to poor growth and red coloration of lower leaves. We rarely have a problem.
Use of compound fertilizers (usually for manufactured for agricultural use)usually causes an excess of P: this leads to excessively vigorous growth, especially if combined with high Nitrogen. Stems tend to shoot up and the plant looses form rapidly. We use low P to maintain compact growth. Monopotassium phosphate or phosphoric acid is used to supply P only when needed to boost growth.
Magnesium (Mg): we actually have an excess of this element in the water as well as some coming from the vermiculite and never add it as a fertilizer. It has an antagonistic relationship with Potassium and Calcium, both of which we must add to counter high Magnesium levels.
Calcium (Ca): Our water has essentially no Calcium nor did we lime our media so there was a constant problem with Calcium deficiency. We now treat our coco peat with Calcium before use and have fewer problems. Deficiency symptoms include leaf tip burn, very small, often abortive, blackened new leaves and tip death. Flowers drop and seed pods develop typical "blossom end rot".
Excess Calcium is generally not a problem but I guess it would cause pH to rise along with magnesium and micronutrient deficiencies, especially iron deficiency chlorosis.
Micronutrients:
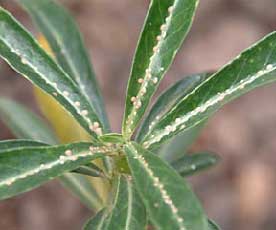
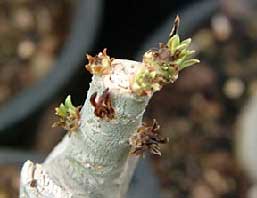 |
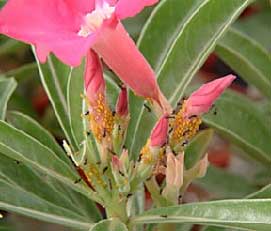
Extreme Boron deficiency halts all new growth in this Adenium that has been pruned back hard. A drench with Solubor was effective in solving this problem. |
We have had problems with several elements. Now we use regular preventive sprays and rarely have problems. How do we know what elements are causing the specific problems despite having no access to testing facilities? I started by guessing the problem from the symptoms (I have a lot of books showing the deficiency symptoms on a lot of different crops- it is helpful to make an educated guess of the problem). We then used the specific salt to try and correct the problem- if it does so, we know the original diagnosis was correct. This is hardly a foolproof method because often one element will partially substitute for the deficiency of another but it is a start.
Boron (B): this is an element in short supply in our soils and so in our pot cultivation too. It is also easily leached and this adds to the problem. Deficiency symptoms are similar to Calcium (distinguished by the fact that Calcium tends to affect the leaf tip and Boron the base of the leaf): leaves deform with corrugations (as if the midrib is too small for the leaf), aborted tip growth and deformed seed pods with corky streaks. Flowers tend to split up. We add boron in the foliar spray at regular intervals.
Copper (Cu): since our mix is high in organic materials which bind copper, we occasionally have a problem with this element. Deficiency symptoms include small, cup shaped new leaves, flowers very much smaller and with distinctly pale coloring and small, twisted seed pods with corky skin. This effect on the seeds pods sounds identical to Boron deficiency but is substantially different in character. A spray of copper fungicide will clear the problem. A drench with Copper Sulphate at at 25gms per 1000 Liters of water also works well for several months to a year.
 |
Leaves of this variegated Adenium get progressively smaller, narrow and strap shaped. A drench with Copper sulphate soon solves the problem, with new leaves then emerging normal. The new emerging leaves of this variegated Adenium are much smaller, narrow, thick and strap shaped, typical symptoms of Copper deficiency. |
 |
Though flower bud abortion is common in Copper deficiency, sometimes the flower will hold but open small with rudimentary petals and very pale color. |
Zinc (Zn): Deficiency normally occurs on large plants in old media, especially if the seed load is too heavy. New growth slows and internodes become very small, leaves become smaller, narrow and often curve to one side. Seed pods will curve inwards, yellow and open up before aborting.
 |
Typical symptoms of Zinc deficiency: pods curve inward, turn yellow, open up and abort. The immature seeds inside show black necrotic areas. Often affect one of a pair of pods. |
Iron (Fe): we rarely have a problem with this as our pH is between 6-6.5. We use acid to reduce the pH of irrigation water to 5.5 if necessary, either with Nitric or Phosphoric acid depending on whether we need the phosphorous or not. Iron deficiency chlorosis is typical and easily cleared up with foliar iron spray along with pH control of the media. Iron chlorosis is often a sign of root damage or death- knock out the plant and check the roots- often the media will be degraded and soggy with little or no new roots. Another reason is an excess of other micronutrients like Cu or Zn - overdoing the drench will show up as Iron deficiency chlorosis.
Pests:
Adeniums are subject to a relatively small number of pests and diseases:
Lapidopterous Larvae:
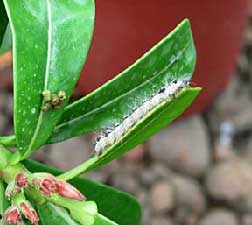
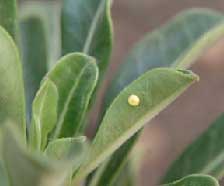
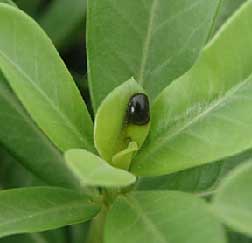
The commonest is the horn worm. We sometimes get an infestation, especially in spring when there are a lot of new shoots. At other times it is just an occasional worm, best picked by hand.
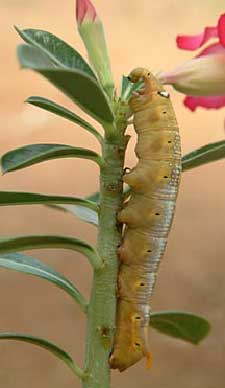   |
| Clockwise: Three different types of caterpillars that attack Adeniums: the one on the extreme left is the commonest and most destructive: it grows the largest and can become widespread if left unchecked; the looper is an occaisional pest and usually solitary. The hairy caterpillar was seen only once. |
 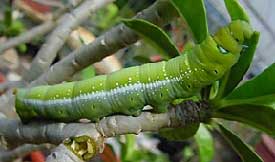 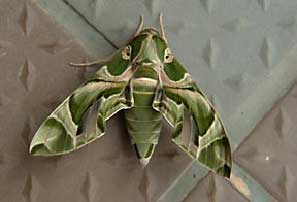 |
| Egg to Adult of the commonest caterpillar on Adeniums: the color of the caterpillar is usually green but can be red when it has been feeding primarily on buds and flowers. |
A good spray of any decent insecticide when caterpillars are first seen will prevent large scale build up. Try and get them early as big worms can eat a lot of the soft shoot and will eat most of a newly grafted top.
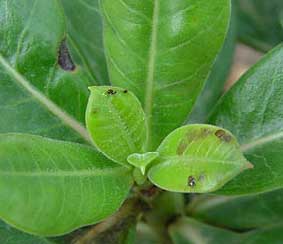
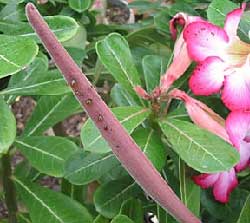
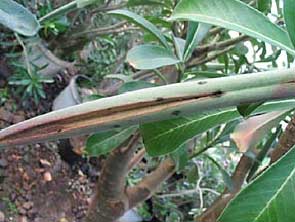
Stink Bugs:
These usually show up at the end of the monsoon. Their natural food seems to be other Apocynaceae seed pods and when they run out of food they take wing and land on the Adeniums en masse.
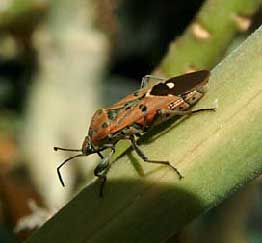  |
| (left) A mature stink bug sucking the juices from an Adenium seed pod; (right) some examples of germinating seeds showing the kind of damage inflicted on seeds by the piercing proboscis of the bug. |
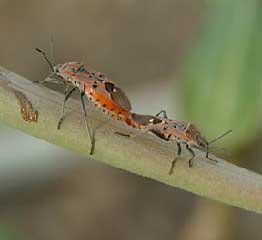 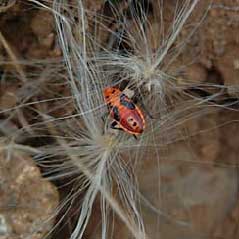 |
| A mating pair on the left: the bugs are most vulnerable at this time and can be caught easily! On the right a nymph on the ground, eating an Adenium seed: wind dispersed seed also carry the nymphs with them. |
They create a lot of problems by sucking the juices from seed pods- young pods ones will abort, larger ones open prematurely- eggs are laid on these open pods and the young feed off the seeds (and other organic debris in the pots and on the ground). The tiny nymphs get carried around on the seed tufts and spread in the nursery.
Even if the pods hold and seeds ripen, germination is affected and one can see seedlings with kinks and other damage where the sucking stylus has pierced the embryo.
Easy to control- unless in very large numbers we just catch them by hand and crush to kill them. A good organophosphate or pyrethroid insecticide will kill them. Scrupulous cleaning measures and ensuring that all aborted seed pods are picked and disposed off will help. Prevention is by using a mesh around the seed bearing plants.
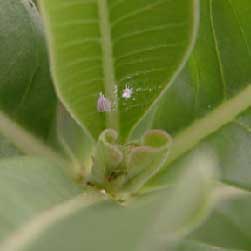
Mealy Bugs:
These are very common pests, usually concentrating on the soft new growth. They distort new growth and flowers (sometimes leading to double flowers!). The leaf distortion is similar to boron deficiency and since the mealy bug causing this may be extremely small, it is often difficult to distinguish between the two. The mealy bugs, however, usually cause a reddish discoloration where the stylets have sucked the juices. This can be seen even on the colored flowers as deeper colored spots.
  |
| (left)A mealy bug nymph with moulted skin besides it on young growth of Adenium arabicum. (right) A small egg cluster in a crevise where it is difficult to reach with insecticides of any kind. |
  |
| Distortion of new growth due to tiny, often invisible mealy bugs. On left leaf distortion and on right flower distortion. In both cases the spots of hyper pigmentation give away the presence of mealy bugs. |
 |
On extremely small buds where distortion is still not evident the hyper pigmentation is characteristic: the infected bud cluster on left in contrast to a clean one on right. |
Once established, it is difficult to totally clear off this pest- possibly they are very resistant to most pesticides. What works best for us is to kill of as many as we can manually (with a brush and 50% isopropyl alcohol) especially the dormant egg cases in winter as well as regular pruning. The new formulations containing Imidacloprid seems to work but not totally, at least for us. Part of the problem is that they are not translocated to the flower buds, where the mealy bugs survive to fight another day!
One sign of mealy bug presence is the presence of lots of ants busy running to and fro: always check what they are up to by following them into the plants- they will lead you to some pest, usually mealy bugs or aphids, both of which secrete sugar. Follow the trail backwards and try to find the nest and destroy it- mealy bug numbers decrease rapidly if ants are controlled.
Stressed plants will harbor large numbers of this pest and need to be identified and rejuvenated with fresh soil and heavy pruning. Weeds are also common reservoirs.
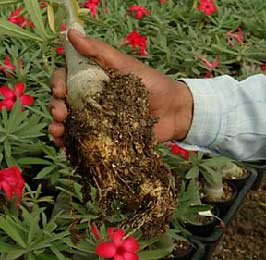
Root Mealy Bugs:
These are often seen on neglected or stressed plants, especially in open, soil less media. Again, the presence of ants going into the pots will often alert one about their presence. Check for them when repotting and in case of plants that seem to be doing badly for no obvious reason.
 |
Seedlings showing white cotton like threads around roots. Closer examination reveals slow moving, flat white insects about 2mm long. It is unusual to see root mealy bugs in vigorous seedlings. |
Adeniums tolerate bare rooting and washing of the roots and this works well if only a few plants are affected. For more widespread problems a granular insecticide like Thimet or the newer Marathon ( active ingredient: Imidocloprid) will usually do the trick.
Spider Mites:
Another important pest is the two spotted spider mite. Usually a problem during the drier winter months, it first starts on the susceptible Adenium species and hybrids, such as A. swazicum and A. bohemianum. If left unchecked it will then spill over onto the other Adeniums. The clones with waxy, shiny leaves are the least likely to have problems.
  |
| Spider mites on an Adenium arabicum seedling: top view showing typical flecking of leaves while bottom shows web formation and slow moving reddish yellow spider mites. |
Part of the solution is to keep the susceptible types separate so that the problem can be identified as soon as possible and spraying started. The first change is loss of the usual healthy look and luster of the leaves. Look out for typical flecking and discoloration of the older leaves. Closer observation will show slow moving yellowish red mites and in advanced cases, web formation under the leaves. We rotate miticides, using Metasystox, Kelthane, Mavrik, Vertimec etc one after another. Removing the most affected lower leaves with heavy mite populations is a good idea but often the best solution, especially late in winter, is to prune all the green growth off the plants and wait for healthy fresh growth in spring.
Aphids:
 |
Aphids on the Adenium cultivar Calypso: for some reason this hybrid is usually the first one to show aphid infestation. This pest, like many others, is closely associated with ants as can be seen in the picture. We try and follow the ants to locate the nest and destroy that in addition to treating the aphids. |
These cause minor problems usually on soft growth in the cooler months. Try and catch it early, when it is readily solved by just rubbing off the pests if they are on isolated plants or with a spray of any effective insecticide if the problem is more widespread. We often use Sevin for this purpose. In many countries Aphids are extremely resistant to common insecticides and you may need to use Marathon or newer products or use organics.
Soft Scale:
I have rarely seen this affecting Adeniums, and then only very neglected plants. I buy such plants only as a last resort and in these cases always check the underside of the lower leaves, where most pests tend to concentrate. Stripping off all the affected leaves along with a dip in a good insecticide before potting works well against this and other pests.
 |
Soft scale: it does not seem to spread rampantly on Adeniums and is easily controlled by pruning off affected branches and treating with a good insecticide. |
Diseases:
A lot of the disease problems affecting Adeniums can be traced back to too much water, either at the roots or on the leaves. Though Adeniums like reasonably high humidity, constantly wet leaves, especially in a stagnant atmosphere or over watering in a badly aerated potting media will invariably lead to problems with rot.
I am not very clear as to which fungal or bacterial species is responsible for which kind of rot. The best I can do is look at the possible problems from a layman's point and suggest solutions based on my experience. Ridomil gives good control over the caudex and root rots but must be used in advance for prevention: once the rot is evident, it does little or no good. At one time we used it every monsoon to limit our losses but now we rarely use it since all our plants are under cover.
Leaf Diseases:
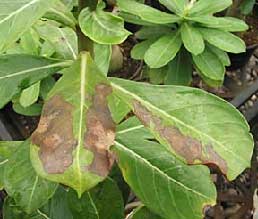
Continuously wet foliage will eventually start turning brown and rotting. White fungal hyphae can be seen after some time and the mass of leaves will stick together. The rot soon spreads down to the soft stems and can be seen as a dark discoloration externally and when cut.
The solution is to prevent wet foliage in the first place. If this is inevitable and plastic cover cannot be provided, spray foliage with a general contact fungicide like Captan at 3gms per litre water on a regular basis. The aim is to cover the foliage with a protective layer of fungicide. If some rotting is seen, pick off the affected leaves and cut back any rotting stems. Always remove any dry leaves or flowers at the beginning of the rainy period and keep plants totally free of any dead material.
Flower Rot:
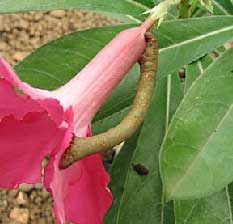
Since we started growing plants on a large scale on raised benches we have had a new problem: closely spaced plants give upward facing flowers; overhead watering fills up the flowers with water and often it rots. Occasionally the flower rot progresses rapidly into the stem and moves some way down before it heals- it has never progressed beyond the upper stem.
 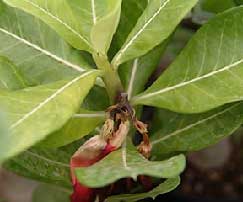  |
| Clockwise: Three stages of flower rot: initially the flower starts to decay due to stagnant water inside; the decay passes onto the pedicel and moves into the stem; finally the stem itself decays and collapses. This is a wet decay and the infected portion remains mushy. |
We solved it to a large extent by watering as early in the morning as possible so that the flowers dry out by nightfall. Ideally we should drip irrigate all the plants and keep the flowers dry.
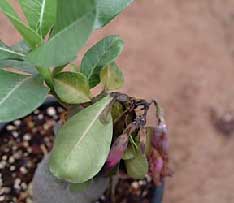
Stem Diseases:
Apart from the stem rotting due to downward movement of leaf rotting pathogens, often the stem will start to decay away from the leaves. This decay will usually be dry but may also be wet. Blocking of the vascular tissue leads to rapid yellowing of the leaves above the rotten portion- usually it is this yellowing that is seen first.
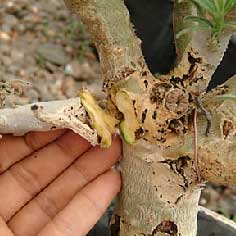
   |
| Clockwise: Stem rot which has dried some what and the decay has stopped progressing. The dead stem portion has formed a natural abscission zone and can be snapped off easily, leaving a clean white ended stub which will heal well and give branches soon. Healthy plants will often cure themselves of rotten tissue this way. |
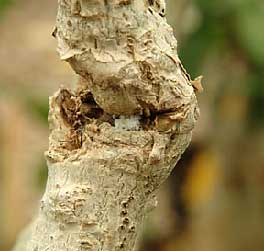
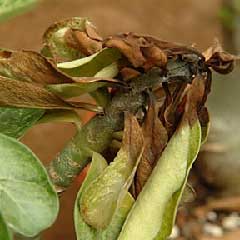
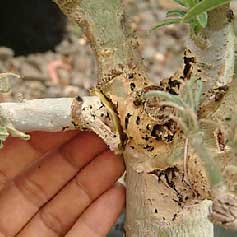   |
| Clockwise: Old dry rot at the junction of several branches: this needs to be cleaned up for aesthetic as well as sanitary reasons: such areas will often hide mealy bugs or their egg cases. Gently pulling away the dead stubs often easily separates them, leaving clean, healthy white tissue. |
Check to see if the affected portion is in the process of healing itself and forming an abscission zone, in which case it can be snapped off. Moist rots are more dangerous and it helps to dry the stem by pulling off the thick epidermis. If you decide to take a less conservative approach, cut the stem back to a healthy white zone to remove the rotten portions as described under pruning.
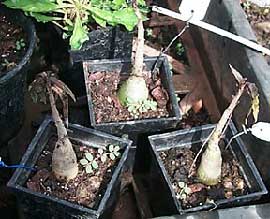
Caudex Rot:
This is probably the same as the above except that it affects the main stem or caudex and leads to all the leaves suddenly drooping and turning yellow. The leaves tend to stay on the stem and yellow from the midrib outwards.
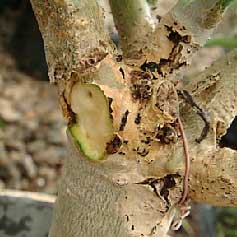
   |
| Caudex rot: a single plant with all its leaves turned suddenly yellow due to caudex rot. Washing the plant reveals almost the entire caudex is discolored and soft while most of the roots have rotted away. Cutting the caudex of this obviously lost cause reveals almost total decay of the tissues. |
This rot is often fatal though larger plants will often heal themselves and carry on with a hollow trunk after the rotten core has decayed off. It helps if the plant is grown hard and relatively dry.
  |
| Another plant which looked very similar to the one above but which recovered on its own: old leaves yellowed and dropped but new growth sprouted. Tearing off the loose skin of the caudex reveals the rotten tissue has mostly melted away and the plant is well on the way to recovery, albeit with a scar for life! On right a plant with a hollow trunk- the central tissue of the caudex has decayed years ago. |
It is often advised that such plants should be removed from their pots and the affected portions scraped off- I don't think this helps unless the healing process has already started and a layer of healthy white tissue seen: in such cases there is little real need to do any scraping as the rotting tissue will decay on its own in time.
Root Rot:
This rot starts below soil level. If it affects the main tap root it will manifest itself with the same symptoms as caudex rot but often only a side root is affected and it is seen only when the plant is being repotted or bare rooted for export.
  |
| The A. somalense variegated plant on left refused to grow and leaves slowly dropped. Remaining leaves lost their sheen too. Knocking out the root ball reveled extensive root rot- a picture of the washed roots on right shows discolored and decayed roots. The caudex too was soft. We cut off the top and re-grafted it and discarded the roots. |
Massive root rot will be seen immediately as yellowing of most or all the leaves followed by leaf shedding: basically a draught response due to abrupt clogging of the water channels.
If the main root of small plants is affected it will usually kill them. In a large nursery a certain amount of mortality is inevitable but substantial root rot points to poorly designed media with inadequate aeration. Big plants will often loose a large tuberous side root without any problem but again, check the media and replace if it is too decomposed.
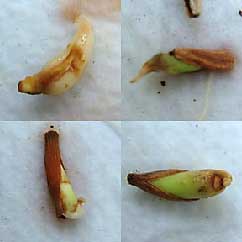
Seedling Damp Off:
Seedlings will rot and shrink just above ground level; the tops remain green and topples over. This is typical Rhizoctonia damping off.
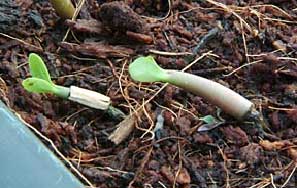 |
Damping Off of Adenium seedlings. The seeds were sown 20 days ago and the seedlings are about 15 days old. This is primarily a problem of very young seedlings- slightly older plants rarely show this disease |
We do not use sterilized media nor do we use fungicides but rarely have this problem with our current media. I feel it is a problem if EC levels of the seed sowing media are high and the media is kept too wet well after the seedlings are up. Using coco peat helps to keep EC low (if you use good quality material) and it has natural antifungal properties. Increasing the media depth reduces water logging. Finally, careful watering during the early stages (refer section on seedling production) will ensure healthy, vigorous seedlings with hard, disease resistant roots and caudexes.
Viral Problems:
About three years ago, we started noticing peculiar symptoms on some plants I got back from Thailand. The problems included patterned mottling on leaves, color break on flowers and split or other wise deformed flowers. Initially we thought these were due to complex micronutrient problems. When sprays and drenches with complete and individual nutrients didn't help, we realized the plants were infected with one or more viruses (or other systemic infectious agent- till tests are done we cannot really tell. In the discussion below, I use the term virus for simplicity but mean "systemic infectious agent").
We now think that almost all stock in Thailand and Taiwan is infected to a greater or lesser extent with virus. With experience I am able to spot even subtle symptoms. The cultivar known as Lynam Tok (Waterfall) is, I think, a red cultivar with a specific symptom to a particular virus. It disappears during warm weather when plants are vigorous and appears in winter.
Viral infection is now rampant in many producing areas because little or no sanitary measures taken during grafting. Most growers are blissfully unaware of the problem; others don't think it affects flowering or growth and so don't care. Certainly it does not cause any fatal problems but I think it does reduce vigor and flowering, at least in many cultivars. When first introduced, new hybrids tend to be more robust than after a year of propagation and virus infection. Viral infection may be one of the biggest problems for the Adenium grower in the future.
Our stock is propagated with constantly sterilized knives (using isopropyl alcohol). Any doubtful plants are immediately rouged (we bury any plants showing obvious symptoms). Following these measures, we have little or no visible incidence of viral infection. Our cultivation technique is now good enough to give very robust growth and this may be another reason for the fact that there is no visible viral problem. How ever, we cannot rule out latent infection- almost all commercially grown roses are similarly infected and only a tremendous effort by some huge growers has enabled them to build and offer virus free stock.
Currently we seem to be the only commercial Adenium grower aware of the problem and taking serious steps to prevent further spread of the virus problem.
One must take the viral issue in perspective though: we have no proof that the Adeniums are actually infected and, as my searches on the net show, in many common plants such as Roses or Poinsettias, almost all stock in cultivation is infected with virus or virus like agents. In some cases this is even beneficial such as the increased basal branching in Poinsettia. The benefits of virus free material for a huge number of cultivated plants are not realized till large growers make the effort and bear the cost of cleaning up stocks.
As long as we take reasonable care to prevent rampant spreading of any potential virus and rogue plants showing virus-like symptoms, we should be OK.
The long term solution is to have a totally new, isolated breeding and propagation effort which we are now setting up. We are also working on techniques to clean up existing stock. We need to identify the virus and be able to index it and would appreciate any help in this direction.
PHYSIOLOGICAL & OTHER PROBLEMS:
Adeniums are subject to a number of problems due to various reasons, not all of them known. The photographs below illustrate some of the common problems we have faced.
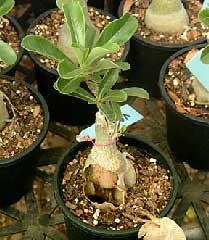
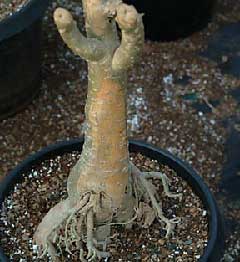
  |
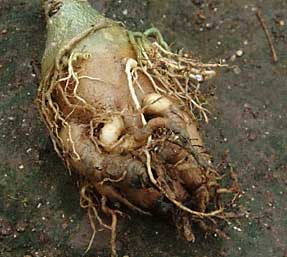
| Plant raised out of its pot: removing the plant shows that the below ground caudex has grown disproportionately and is literally pushing the plant out of its pot. Repotting into a taller pot is one option, while a more drastic one is to cut off the bottom few inches of the root caudex. |
  |
| Sunburn: first on a caudex immediately after pruning the top- removal of shade from the leaves caused the burn. Bleached and burnt leaves: this cultivar (Adenium arabicum "Golden Dragon") is a particularly tender one and needs shade in summer. |
  |
| Fluid exudation from the leaves: this phenomenon is seen on very hot and very humid days: the plants take up water but are unable to release it by transpiration, literally causing the vessels to burst. It's a self limiting problem but leaves unsightly stains on leaves. |
  |
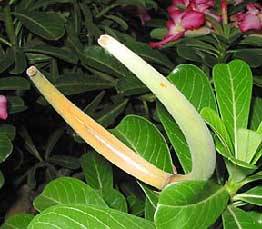
| Seed pods, if present are also affected: the one on extreme left shows fluid exudation. On right a seed pod which is mature but unripe: such pods have little flexibility and open along the seam due to internal fluid presure: this opening will usually heal itself but keep water off the opened pods to prevent rotting. |
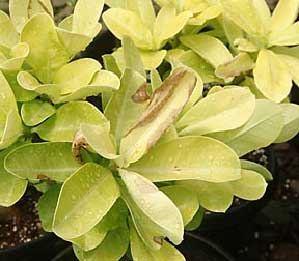
  |
| Phytotoxicity: Left: leaf burn due to use of insecticide in too high a concentration in full sun. On right: seedlings of Adenium somalense var. crispum dead after a spray of Dithane M45: this species seems to be highly sensitive to this fungicide. |
 |
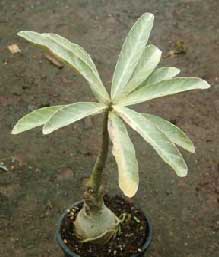
Brilliant chlorosis in an Adenium seedling: this kind of chlorosis is occasionally seen and is usually transient. It might cause irrational exuberance in the inexperienced, who may think they have found a new variegated cultivar! |

© Copyright Tropica Nursery 2026. All Rights Reserved.
Maintained by MiracleworX Web Designer Mumbai
